Overview
Terraform enables you to safely and predictably create, change, and improve infrastructure. It is an open source tool that codifies APIs into declarative configuration files that can be shared among co-workers, treated as code, edited, reviewed, and versioned.
Objectives
In this lab, you will learn how to perform the following tasks:
Get started with Terraform in Google Cloud.
Install Terraform from installation binaries.
Create a VM instance infrastructure using Terraform.
Setup and Requirements
Qwiklabs setup
Before you click the Start Lab button
Read these instructions. Labs are timed and you cannot pause them. The timer, which starts when you click Start Lab, shows how long Google Cloud resources will be made available to you.
This hands-on lab lets you do the lab activities yourself in a real cloud environment, not in a simulation or demo environment. It does so by giving you new, temporary credentials that you use to sign in and access Google Cloud for the duration of the lab.
What you need
To complete this lab, you need:
- Access to a standard internet browser (Chrome browser recommended).
- Time to complete the lab.
Note: If you already have your own personal Google Cloud account or project, do not use it for this lab.
Note: If you are using a Chrome OS device, open an Incognito window to run this lab.
How to start your lab and sign in to the Google Cloud Console
Click the Start Lab button. If you need to pay for the lab, a pop-up opens for you to select your payment method. On the left is a panel populated with the temporary credentials that you must use for this lab.
Copy the username, and then click Open Google Console. The lab spins up resources, and then opens another tab that shows the Sign in page.
Tip: Open the tabs in separate windows, side-by-side.
In the Sign in page, paste the username that you copied from the left panel. Then copy and paste the password.
Important: You must use the credentials from the left panel. Do not use your Google Cloud Training credentials. If you have your own Google Cloud account, do not use it for this lab (avoids incurring charges).
Click through the subsequent pages:
- Accept the terms and conditions.
- Do not add recovery options or two-factor authentication (because this is a temporary account).
- Do not sign up for free trials.


After a few moments, the Cloud Console opens in this tab.
Activate Cloud Shell
Cloud Shell is a virtual machine that is loaded with development tools. It offers a persistent 5GB home directory and runs on the Google Cloud. Cloud Shell provides command-line access to your Google Cloud resources.
In the Cloud Console, in the top right toolbar, click the Activate Cloud Shell button.

Click Continue.

It takes a few moments to provision and connect to the environment. When you are connected, you are already authenticated, and the project is set to your PROJECT_ID. For example:

gcloud is the command-line tool for Google Cloud. It comes pre-installed on Cloud Shell and supports tab-completion.
You can list the active account name with this command:
(Output)
(Example output)
You can list the project ID with this command:
(Output)
(Example output)
What is Terraform?
Terraform is a tool for building, changing, and versioning infrastructure safely and efficiently. Terraform can manage existing, popular service providers and custom in-house solutions.
Configuration files describe to Terraform the components needed to run a single application or your entire data center. Terraform generates an execution plan describing what it will do to reach the desired state, and then executes it to build the described infrastructure. As the configuration changes, Terraform can determine what changed and create incremental execution plans that can be applied.
The infrastructure Terraform can manage includes both low-level components such as compute instances, storage, and networking, and high-level components such as DNS entries and SaaS features.
Key features
Infrastructure as code
Infrastructure is described using a high-level configuration syntax. This allows a blueprint of your data center to be versioned and treated as you would any other code. Additionally, infrastructure can be shared and re-used.
Execution plans
Terraform has a planning step in which it generates an execution plan. The execution plan shows what Terraform will do when you execute the apply command. This lets you avoid any surprises when Terraform manipulates infrastructure.
Resource graph
Terraform builds a graph of all your resources and parallelizes the creation and modification of any non-dependent resources. Because of this, Terraform builds infrastructure as efficiently as possible, and operators get insight into dependencies in their infrastructure.
Change automation
Complex changesets can be applied to your infrastructure with minimal human interaction. With the previously mentioned execution plan and resource graph, you know exactly what Terraform will change and in what order, which helps you avoid many possible human errors.
Verifying Terraform installation
Terraform comes pre-installed in Cloud Shell.
Open a new Cloud Shell tab, and verify that Terraform is available:
The resulting help output should be similar to this:
Build infrastructure
With Terraform installed, you can immediately start creating some infrastructure.
Configuration
The set of files used to describe infrastructure in Terraform is simply known as a Terraform configuration. In this section, you will write your first configuration to launch a single VM instance. The format of the configuration files is documented here. We recommend using JSON for creating configuration files.
In Cloud Shell, create an empty configuration file named
instance.tfwith the following command:
Click Open Editor on the Cloud Shell toolbar. To switch between Cloud Shell and the code editor, click Open Editor or Open Terminal as required, or click Open in a new window to leave the Editor open in a separate tab.
Click the
instance.tffile and add the following content in it, replacing<PROJECT_ID>with your Google Cloud project ID:
This is a complete configuration that Terraform is ready to apply. The general structure should be intuitive and straightforward.
The "resource" block in the instance.tf file defines a resource that exists within the infrastructure. A resource might be a physical component such as an VM instance.
The resource block has two strings before opening the block: the resource type and the resource name. For this lab, the resource type is google_compute_instance and the name is terraform. The prefix of the type maps to the provider: google_compute_instance automatically tells Terraform that it is managed by the Google provider.
Within the resource block itself is the configuration needed for the resource.
In Cloud Shell, verify that your new file has been added and that there are no other
*.tffiles in your directory, because Terraform loads all of them:
Initialization
The first command to run for a new configuration—or after checking out an existing configuration from version control—is terraform init. This will initialize various local settings and data that will be used by subsequent commands.
Terraform uses a plugin-based architecture to support the numerous infrastructure and service providers available. Each "provider" is its own encapsulated binary that is distributed separately from Terraform itself. The terraform init command will automatically download and install any provider binary for the providers to use within the configuration, which in this case is just the Google provider.
Download and install the provider binary:
The Google provider plugin is downloaded and installed in a subdirectory of the current working directory, along with various other book keeping files. You will see an "Initializing provider plugins" message. Terraform knows that you're running from a Google project, and it is getting Google resources.
The output specifies which version of the plugin is being installed and suggests that you specify this version in future configuration files to ensure that terraform init will install a compatible version.
Create an execution plan:
Terraform performs a refresh, unless explicitly disabled, and then determines what actions are necessary to achieve the desired state specified in the configuration files. This command is a convenient way to check whether the execution plan for a set of changes matches your expectations without making any changes to real resources or to the state. For example, you might be run this command before committing a change to version control, to create confidence that it will behave as expected.
Apply changes
In the same directory as the
instance.tffile you created, run this command:
This output shows the Execution Plan, which describes the actions Terraform will take in order to change real infrastructure to match the configuration. The output format is similar to the diff format generated by tools like Git.
There is a + next to google_compute_instance.terraform, which means that Terraform will create this resource. Following that are the attributes that will be set. When the value displayed is <computed>, it means that the value won't be known until the resource is created.
Example output:
If the plan was created successfully, Terraform will now pause and wait for approval before proceeding. In a production environment, if anything in the Execution Plan seems incorrect or dangerous, it's safe to cancel here. No changes have been made to your infrastructure.
- For this case the plan looks acceptable, so type
yesat the confirmation prompt to proceed. Executing the plan will take a few minutes because Terraform waits for the VM instance to become available
After this, Terraform is all done!
Test completed task
Click Check my progress to verify your performed task. If you have completed the task successfully, you will receive an assessment score.
- In the Google Cloud Console, on the Navigation menu, click Compute Engine > VM instances to see the created VM instance.
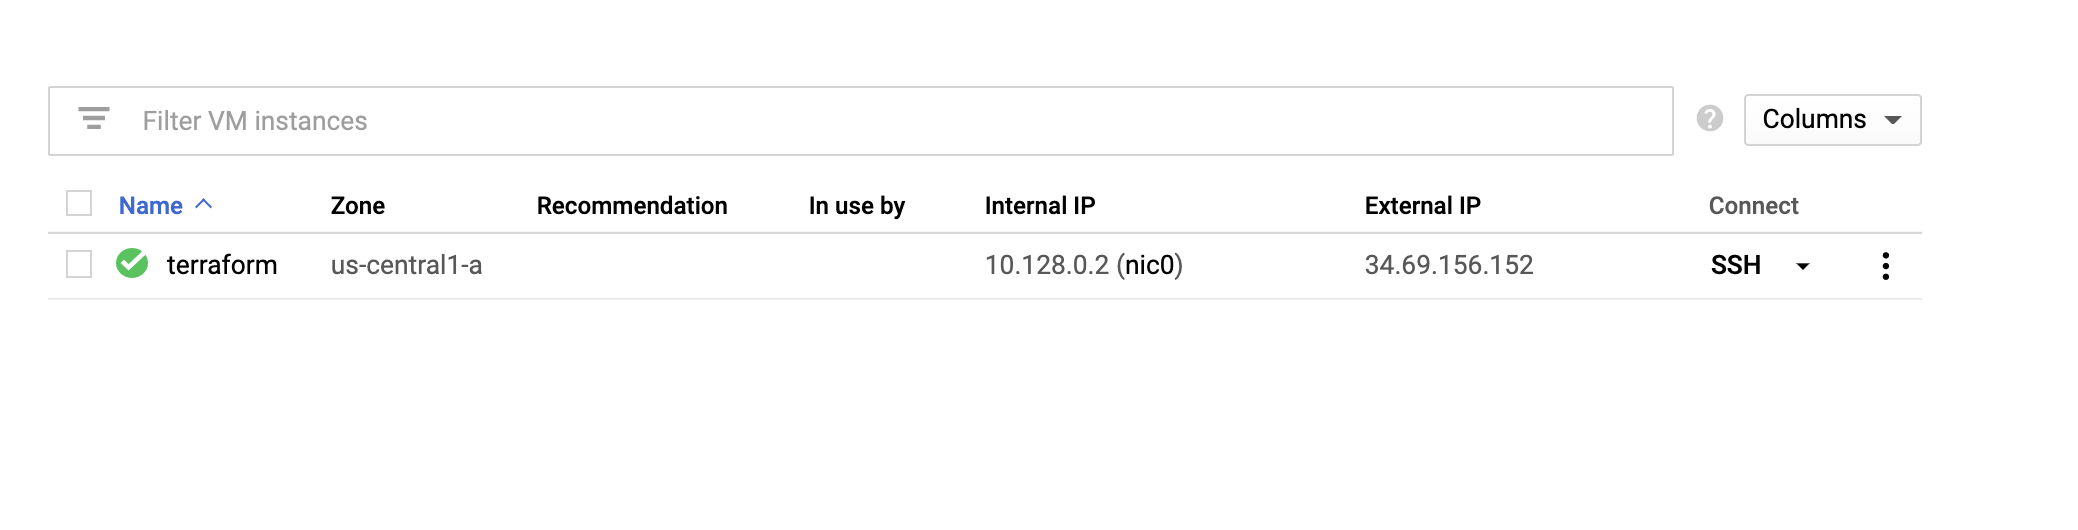
Terraform has written some data into the terraform.tfstate file. This state file is extremely important: it keeps track of the IDs of created resources so that Terraform knows what it is managing.
In Cloud Shell, inspect the current state:
Example output:
You can see that by creating this resource, you've also gathered a lot of information about it. These values can be referenced to configure additional resources or outputs.
Congratulations! You've built your first infrastructure with Terraform. You've seen the configuration syntax and an example of a basic execution plan and understand the state file.
Test your understanding
The following multiple choice questions should reinforce your understanding of this lab's concepts. Answer them to the best of your abilities.